
| Proud Weave Crafter |
Gianina Cojuangco
|
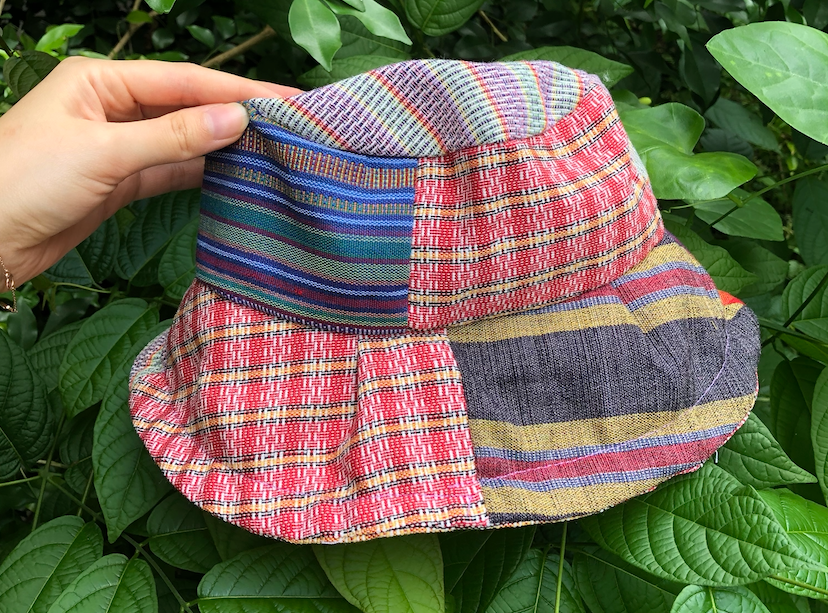
In this tropical weather, these bucket hats are a year-round must-have! Fashionably shade yourself from the sun or rain. Accessorize with this hat for an elevated pop to any outfit.
This project is a fun way to use fabric scraps. Get your fabric scraps from ANTHILL and whatever else you may have on hand, this could come from another project or old clothes with fun patterns. ANTHILL’s weaves were perfect for this project because the thickness of the textiles helped keep the hat in proper shape.
If you’re new to handling a sewing machine, this is the perfect project to start with (I promise you, because it was MY first project). The most challenging part might have been cutting the fabric and designating it to each stencil pattern but once that’s done, it’s smooth sailing sewing from there. If you’re up for a more intermediate challenge, you can try putting together smaller pieces of scrap fabric using the same patterns to make up your bucket hat. I can also imagine hand-stitching excess fabric to create another layer of design on the hat. Really, feel free to mix-n-match various fabrics for a combination that screams “YOU!” The idea here is to lessen our waste and find new ways to use “scraps” in whatever way you can. The more ZERO-WASTE you can make it, the better.

| What you’ll need: |
|
(1) Print and cut out your bucket hat pattern. Assign a fabric for each pattern, get creative and mix and match fabric scraps.
(2) You will need the following fabric pieces: 1x CIRCLE TOP 2x FULL BRIM, cut on the fold 4x HALF BRIM, with 1/2-inch seam allowance 4x HEADBAND, with 1/2-inch seam allowance
(3) Pin the pattern on the fabric and cut along the edges or use a tailor’s chalk to outline the shape. Try to maximize as much of the fabric as possible by cutting/outlining from the edges. For easy access, you may want to label or group together the cut-out fabric pieces as “Circle Top,” “Brim,” and “Headband.”
(4) Once you have all the essential pieces to build your bucket hat, it’s time to start sewing. Get your sewing machine ready!
(5) HEADBAND + HEADBAND. Using the cut-out pattern, align two pieces of the HEADBAND together so they match up. Mark where the cut-out pattern ends with a pin or tailor’s chalk and sew along that line. This will connect the two fabrics together. Repeat this step with the other two pieces. You will end up with two full HEADBAND pieces.
(6) FULL HEADBAND. Take the two full pieces of the headband. Lay one of them “good side” up and the other “good side” down on top of each other. The good or smooth sides should be facing each other and the edges should be aligned, more or less. Pin the side edges together to keep them in place as you sew them together leaving a cm to half a cm seam allowance (follow this allowance throughout this project). Sew along the pinned edge on the right side and repeat with the left side. And there you have your headband! Cut away any hanging thread.
(7) FULL HEADBAND + CIRCLE TOP. As you lay down the headband flat, you will notice that the sides angle out very slightly (refer to arrows in the picture). Match the top/shorter end of the headband to the circle top. Pin the two pieces together as you go around the CIRCLE TOP to connect it to the HEADBAND. Again, the “good side” of each piece should be facing each other so that when you flip it over, the seams are hidden. Sew along the pinned section to connect the two pieces. Flip it over to reveal 2/3 of your finished bucket hat or the part that will sit atop your head.
(8) HALF BRIM + HALF BRIM. Follow the same instructions as in Step 5, but replace HEADBAND with HALF BRIM. By connecting two pieces of your half brims together, you will have another 2 NEW FULL BRIMS.
(9) FULL BRIM + NEW FULL BRIM. Take the FULL BRIM and match the NEW FULL BRIM atop it so that the “good sides” are facing each other again (while sides with seams are facing you and the table). Align the edges once again as much as you can. Pin the bottom or longer side of the BRIM and sew along the pinned edge. Repeat with the second piece.
(10) COMPLETE THE BRIM. You now have two pieces of a weirdly shaped brim, you’re almost done! Lay them down flat (they won’t stay completely flat but there’s no need to worry) and match them on top of each other again with the “good sides” facing each other. Align the edges as much as possible and pin along the side sections (the shorter/ angular sides). Sew along the pinned edges. It may not look like anything now but all you have to do is fold out the fully sewn brim to its good side and you will have something that now looks like the brim of a hat that goes around your head (all the seams should be nice and hidden).
(11) Now it’s time to take out your iron and iron down the completed BRIM so its stays flat and in place.
(12) STITCH ALONG THE BRIM. Sew around the brim of the hat about 1/2-inch from the edge. You may continue adding more layers of stitches around the brim to give it more shape or as an added design. For this project, I just stuck with one layer of stitches around the brim.
(13) ATTACH THE BRIM TO THE REST OF THE HAT. Similar to Step 7, it’s time to take the top side (or shorter side with the rough edges) of the BRIM and match it with the bottom (or rough edge of the headband/top part of the hat). Pin around the edges and align the two edges as much as possible (any excess fabric can be hidden and tucked in) with the good sides facing each other. Sew along the pinned edge. Flip it over and there you have your completed patchwork bucket hat!


| Bonus: Any more small excess fabric can be hand sewn onto the hat to add more texture and design to the “patchwork.” |
Congratulations!
You are now a Proud Weave Wearer and the proud owner and maker of your very own one-of-a-kind patchwork bucket hat.
HOPE YOU HAVE FUN WITH IT! We’d love to see your version of the patchwork bucket hat — Share your completed projects and designs with us by tagging us on @anthillfabric and use the #ProudWeaveCrafter #ProudWeaveWearer
Leave a comment